> ## Documentation Index
> Fetch the complete documentation index at: https://docs.edbb.com/llms.txt
> Use this file to discover all available pages before exploring further.
# Enable VNC on Your VPS
> Turn VNC on or off from the EDBB Control Panel so you can reach the console via Open Console or a desktop VNC client.
# Enable VNC for Console Access
VNC provides a screen-and-keyboard view of your VPS even when SSH or RDP is unavailable. Enable it only while you need interactive console access and turn it off afterward.
***
## What You’ll Need
Sign in to the EDBB Control Panel and open the VPS you want to manage.
Plan a brief window—it’s best to enable VNC only when you’re actively using it.
You can use the built-in Open Console button (browser-based) or a desktop VNC client such as RealVNC/TightVNC.
***
## Step 1 – Toggle VNC
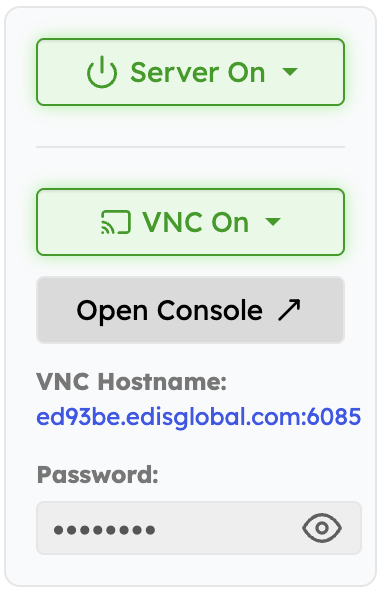
In the service Control Panel, locate the quick action panel. Click the arrow next to the red VNC Off button and choose Enable VNC.
 The button turns green and displays VNC On. The panel now shows the VNC hostname and password for desktop clients.
 ***
## Step 2 – Open the Console
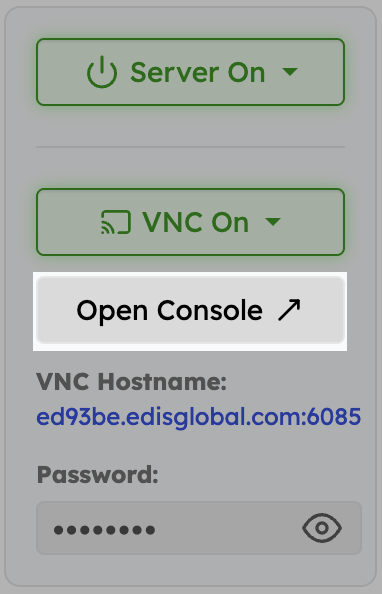
* Click Open Console to launch the browser-based console. No password is required for this view—just click inside the window to capture keyboard and mouse input.
* Prefer a desktop client? Copy the VNC hostname and password shown in the panel and connect using RealVNC, TightVNC, or any compatible viewer.
##
***
## Step 2 – Open the Console
* Click Open Console to launch the browser-based console. No password is required for this view—just click inside the window to capture keyboard and mouse input.
* Prefer a desktop client? Copy the VNC hostname and password shown in the panel and connect using RealVNC, TightVNC, or any compatible viewer.
##  ## Step 3 – Disable VNC When Finished
Open the dropdown beside VNC On and choose Disable VNC once you’re done troubleshooting or installing software.
After disabling VNC, reconnect using SSH or RDP as normal. The console will no longer be accessible until you enable VNC again.
Leaving VNC enabled exposes an additional attack surface. Disable it when you’re finished to keep the VPS secure.
You can now confidently toggle VNC on and off whenever you need direct console access to your EDBB VPS.
## Desktop VNC Client Instructions
Connect to your server using your preferred **VNC Viewer** (for example: RealVNC, TightVNC, or UltraVNC).
1. **Open your VNC Client** on your computer.
2. **Enter the VNC Server address and port** shown in the **Information card** (e.g. `your-server-ip:5901`).
3. **Use the VNC password** provided in **Step 1 – Start VNC**.
4. Click **Connect** to establish the session.
💡 *Tip:* If the connection fails, make sure the Rescue System or VPS is running.
## Step 3 – Disable VNC When Finished
Open the dropdown beside VNC On and choose Disable VNC once you’re done troubleshooting or installing software.
After disabling VNC, reconnect using SSH or RDP as normal. The console will no longer be accessible until you enable VNC again.
Leaving VNC enabled exposes an additional attack surface. Disable it when you’re finished to keep the VPS secure.
You can now confidently toggle VNC on and off whenever you need direct console access to your EDBB VPS.
## Desktop VNC Client Instructions
Connect to your server using your preferred **VNC Viewer** (for example: RealVNC, TightVNC, or UltraVNC).
1. **Open your VNC Client** on your computer.
2. **Enter the VNC Server address and port** shown in the **Information card** (e.g. `your-server-ip:5901`).
3. **Use the VNC password** provided in **Step 1 – Start VNC**.
4. Click **Connect** to establish the session.
💡 *Tip:* If the connection fails, make sure the Rescue System or VPS is running.